Wednesday 12 September 2012

Let me open with an apology, things have been quite mental over the past few weeks and my time for modelling and painting has been limited at best. This doesn't mean I have not taken the chance when it's been presented to work on a few bits and bobs. First up is my very first attempts at using modelling putty or greenstuff. The Dark Reaper exarch was a second hand job from ebay where the previous owner had decided to remove the front detailing on the chest for whatever reason. the original model had the straps crossing over with a skull on top however as this was my first attempt at modelling ever I opted for the more straightforward approach of just doing the straps. once this is undercoated i'm hoping you wont even be able to tell that the straps were not there all along. :D


 Alongside this you have the beginnings of my female farseer model. a lot of work still needs doing to her including the addition of a long coat, detailing on the head 'fin' and some other eldar type bit's.
In these two photo's you can see i've pinned the head and the arms into place to give a better idea of how she will be posed, as you can see she's still missing her sword in the left hand. More to follow on this little project.
  

 Next up, my friend has given me some of his chaos marines to work on, these have mostly been glued and undercoated and he wants them in thousand sons colours so i've started on one of the models, base coated and highlighted the blue areas and started on the gold trim. only about a third of the way through and i'm pretty chuffed with the results so far. He's also going to be letting me have a go at painting his defiler so I have plenty to be keeping me going....

Did I mention that i've also picked up the limited edition dark vengeance boxed set as well as ordering a load of  terrain oriented bits which i'll make into a video and post on youtube when i'm done, ordered a set of 72 Vallejo paints oh and this arrived in the post today:


So yeah, plenty to be keeping me busy, now just to find the time to actually sit down and get through it all!!!!

Saturday 21 July 2012

Magnets and stuff!


So heres some of the things i've been working on recently when i've not been programming, working on pygmy hogs rescue stuff and not helping establish a fledgling games studio, if you've not seen it yet then please check out www.pricklyproductions.co.uk, follow us on twitter, like us on facebook etc etc!

So my magnets arrived and i've been working out the best way to use them, mainly for the support platform / war walker weapons as they use the same spuce so having a bigger pool of interchangable weapons made a lot of sense! I have 2 different sizes of magnets 2mm x 1mm and 3mm x 1mm. The slightly bigger ones I will be using on the weapon mounts, arm sockets, general joints etc and the smaller ones will fit on the actual arms and the underside of the weapons.

I had originally tried out the idea of having a small cut to shape piece of paperclip on the mount and only using the magnets on the weapons themselves,

This did work to some extent but the strength of the magnet - clip is no where near as strong as I would have liked.

Here's my support weapon platform that is part of the first 10 man squad i'm painting, its not finished but it'll help to illustrate what I mean. you can see the mount at the back has the bit of paperclip in and here's the practice weapon I have magnetised.

The hold on this is very weak, to put it into perspective here is the same weapon mounted on a war walker, the hold here is magnet to magnet and I can actually hold the model by the weapon and lift it off the ground, which I cant do with the weapon platform which is considerably lighter.

Heres the magnet placing on the model itself, you could add greenstuff etc to it in order to blend it in if your particularly focused on the details but to be honest its not noticable when you have the weapons on it anyway.

I think these images give you an idea of what to do with these magnets however I will put a guide up on what i've done, how to do it if theres enough interest. It's very very simple, straightforward and very very cheap. I think I paid maybe £5 total for 300 magnets which includes shipping.

Friday 29 June 2012

So I has MOAR stuff!!

Well the title says it all, i've added the new stuff in brackets!!


1 Autarch (new),
86 Guardians (19 new),
8 Guardian jetbikes,
6 Howling Banshee's(1 new),
2 Dire Avenger's( I also have 11 dire avenger heads + bits so will turn some of my many guardians into Dire's),
3 Support Weapon Platforms with crew,
2 Striking Scorpions,
1 Swooping Hawk Exarch,
7 Rangers (6 new) ,
1 fire Dragon,
1 warp spider (new),
1 Falcon Grav Tank,
1 Night Spinner Grav Tank,
1 Fire Prism (new),
3Vyper Jetbike's(2 new),
3War Walker's(2 new),

I really should get round to working out a rough points value, though this will change with new 6th being release so might hold off for now on that.

 So I started painting my 10 man guardian squad + weapon platform as detailed in my last post, they are all sitting waiting on detail work being done. I was in dire need of a HQ and I didnyt want to be limited to just my autarch soooooo I am going to cratch build a female farseer (I dont think GW actually does a female farseer mini), heres the bits i have for her so far.
I'll go from left to right;
Top row: a helm that i've glued what I think was some kind of Halberd point onto the back of, i'll put some greenstuff on this and add some spirit stones plus some minor farseer type glyph on the helm, then theres some random legs I got with one of my ebay special buys, no idea what it was originally, but the robs fit in well with the farseer theme, then we have some jetbiker legs (can you tell what my plan is yet?). 
Middle row: female guardian torso, i've removed the vents from the standard guardian torso and will make this look a bit more fancy again with more farseer type stuff, then there are the helm decorations from a busted avatar that I picked up, again part of a bundle along with this random curved thing, I think its off a reaper weapon. Magnets!! :)
Bottom row: a dire avenger exarch pistol, the blade from the avatar's sword, dire avenger exarch sword and a load of greenstuff.

So my plan is to magnetise the farseer so that she can be a stand alone mini or be mounted on a jetbike. This will be my first time using greenstuff, magnets and actually my first scratch built eldar project so I will try to keep a step by step 'how I did it' going until she's done. This picture shows the legs / torso, held together with blu - tac atm, next to one of the guardians i'm currently working on purely for a size comparison, the farseer model will work out slightly smaller but this is fitting for the female frame i think. :D


Friday 22 June 2012

So as promised, here's my list of things that i'll be doing on the blog in the near future, not necessarily in the listed order but these should give you an idea of what to look forward to:

  • More ebay bargins and my current list of Eldar including rough idea of points,
  • step by step stripping of miniatures: Metals,
  • step by step stripping of miniatures: Plastics,
  • My first squad in the green scheme,
  • Conversions with some green stuff,
  • Magnets!!
  • MAYBE some work on a friends chaos marines..
  • sample painted miniature: mainly white scheme,

And here's the start of tonight / tomorrows entertainment, 8 guardians undercoated and ready to be painted the same as the finished model. If I have enough time i'll also add the squads heavy weapon platform and gunnery crew too. All of these models were stripped using the technique i'll be sharing with you all in my 'step by step stripping of miniatures: Plastic' guide listed above.


Thursday 21 June 2012

Wow it's been a bit longer than I thought since my last post but thats college done for the summer so a lot of time to focus on this stuff. I've drawn up a 'to do list' of things i'll be getting done and then updating over the next few weeks or so which i'll get up in the next few days.

So anyways, the postman's been and i've got some news bits and bobs, namely my undercoat spray and a few paints that I needed for my colour scheme. I also got a few bits that I picked up cheap from Germany AND my shiney 'almost' new codex.

As I have so many guardians I figured I could do with trying out 2 different variations of the same theme and go ahead and paint the rest with which one I liked best... or even just go ahead with both for some variety if they both come out well.

So I started off by trimming all the moulding lines off both models and then applying my white undercoat.

I then basecoated the majority of the model in snot green followed by a Biel-Tan green wash. I then lightly drybrushed a mix of snot green and moot green over this with a line highlight on the edge of the armour plates in moot green. The Gem is a layer of tentacle pink with a stroke of 50/50 pink and white over the lower half followed by a dot of pure white on top to simulate a gemstone. The helm was painted pure white with some blood red in the eyes. The metal's and gun were basecoated black with boltgun metal picking out the detail. You'll notice that I havn't done anything with the base just yet, this is mainly because I've yet to decide what i'll be doing for the whole army base wise so once i've decided on a theme i can then make sure they all tie in together.

You'll have to excuse the pose the model is in, this is a second hand model so my choice was limited. :S


I really like the green scheme so will paint a whole squad up in this, finish off the white guy though I think I might darken him up a bit and then highlight in white to try and get some more definition on it and then put some more pics up.

Monday 21 May 2012

It starts! Paint area, ideas and stripping...

Hello good people of the internet!

I figured i'd show off a little of my working area, a stripped model that I got off ebay, an initial idea of how my icons etc could sort of look when painted onto the models and the start of a long learning curve in painting again.

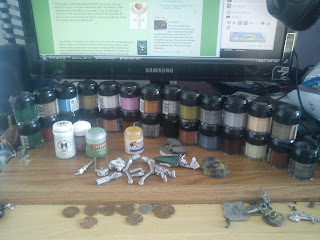
First up a couple of snaps of my desk, cluttered yet workable this will be the hub of my modelling activities over the course of this blog. You can see in the pic the collection of paints I picked up online, second hand.... from ebay.. Yes, yes I should really stop going on there, fear nto i have actually purchased some undercoat and a load of paints directly from GW to compliment what I currently have. I have to say I was somewhat dubious as to getting second hand paints, minatures can be stripped etc so even if they look naff you can pretty much get them back to a 'fresh model' with a little bit of work, but paints could be in any state as you rarly get to see inside the pot's on the pictures. Out of 31 paints only a couple needed some life worked into them(read some water added and beaten into submission with a cocktail stick) and one is pretty rubbish it was pretty much set in the tub. They were all hardly used aswell so i managed to pick up a bit of a bargin. :D

A quick note on stripping models, you can see an example of a second hand war walker (old style) currently on my desk, I used nothing more than some nail varnish remover and a toothbrush to get rid of the old paint job each part was soaked for 10 minutes then rubbed down till the paint was gone. Cheap and easy to do, but only really works with the metals. I've got some stuff on order to do the plastic models as the nail varnish remover kinda makes the plastic go soft so isnt advisable for using with them, so i'll update with more details when I have tried that out.

So onto my paint stuff, as i've said before i'll be painting my army in the green and white Biel-Tan colours, i've shown some examples of their colours and icons used, excuse the bad photoshop skills but this is a close approximation to the freehand stuff I will be aiming to do on some of the larger models. I was trying to get a blended effect on the colours with some shading aswell, hopefully after some experimentaation this will look better on the model than it does in photoshop. :S


Also for your viewing pleasure an example of my attempts at blending on a jetbike model that wont be used for anything other than spares / practice as it was part of a job lot of stuff I bought from ebay and I already have a lot of jetbikes in much better shape to work with.

The pic with the seat to the left side I have tried to use a 'wet blend' fading from a dark angels green through snot green and finally goblin green at the bottom and around the edge. Wet Blending btw is a process of mixing very diluted paint while still wet on the model itself to achieve a smooth transition of colour from one shade to the next. It was only my first go at the technique and I think all I managed to do was make a new green and put some lighter green on one edge.


The other side was done using a 'dry blend' approach where I painted the dark green towards the top, the snot green at the bottom and slowly worked the snot green into the dark angels till there was no paint left on the brush. I'll then add a highlight around the bottom edge with the goblin green to finish it off.


I much prefer the pic with the dry blend aproach, this was also significantly easier to do than the wet blend method, so I think i'll stick to the dry and try to refine that going forward. That about wraps up everything I have to say at the moment, I'll try to get some stuff up as and when my new purchases arrive!!!

Saturday 19 May 2012

So I've been spending a bit of time over the past week or 2 looking at all sorts of painting guides, techniques and what not. When it comes to Eldar there are 5 'main' craftworlds each with their own colour schemes and army types; Alaitoc(Blue and Yellow), Biel-Tan(Green and White), Iyanden(Yellow and Blue), Saim-Hann(Red and Black) and Ulthwé(Black and Bone). Note the colours in brackets denote the primary colour first followed by the secondary one. Each has a main symbol / icon / rune associated with it; The Eye of Isha - Ulthwé, The Shrine of Asuryan - Iyanden, The Cosmic Serpent - Saim-Hann, The Reborn - Biel-Tan and The Doom of Eldanesh - Alaitoc.

Personally I particularly like the Biel-Tan colour scheme which focuses on Green and white with 'The Reborn' (The symbol looks a bit like a cross with a cup on top with a heart in it and symbolises reincarnation). An Example of this can be seen here (note this is a games workshop image I'm simply using it to illustrate):


You tend to find with a lot of Biel-Tan armies the standard green white combo. some favour white as the primary colour, some favour green, some even use greys instead of the whites for a more unique looks. A common feature of Biel-Tan armies, the vehicles in particular, is a stylised thorns pattern, commonly found on large areas of solid colour such as vehicle armour. Example here, this one is used on a banner in conjunction with 'The Reborn' symbol (again this isn't mine I'm simply using it as an example):

Now while I do like the thorns style generally speaking I'm going to be attempting something a bit different with it... Which I will put some pictures up when I've worked on it a bit more.

I've also been on eBay again. :S Picked up a codex and some paints, 31 to be exact, and have tried my hand at 'blending' on a mini that was kinda unusable so I will put some pictures of that up too.

Friday 18 May 2012

So here's the list of minatures i've managed to pick up, some old models and some new, all of them are in various stages of completion / need of repair, some are in need of striping, some just need a repaint, some will be canabalised for other models and some will just be used to practice techniques on. I have a codex on its way, once that arrives i'll total up a rough points equivalent although i'm not expecting it to be a competative list by any means:

67 Guardians,
8 Guardian jetbikes,
5 Howling Banshee's,
3 Dire Avengers,
3 Support Weapon Platforms with crew,
2 Striking Scorpions,
1 Swooping Hawk Exarch,
1 Ranger,
1 fire Dragon,
1 Falcon Grav Tank,
1 Night Spinner Grav Tank,
1 Vyper Jetbike,
1 War Walker,

All in all this would have cost in the region of £340 brand new, but I paid around £110 so I cant really complain! And here's some pictures of the assembled/unassembled masses:


More on colour schemes, idea's and inspiration in the next article....
So a long long time ago I was a collector of citadel minatures, were talking 8-9 years ago now, I had a small wood elf army for Warhammer and ultramarine and chaos for 40k. I'd go along to the stores and have the odd game with my pals, never really entered any tournaments or anything like that, then I discovered a more outgoing social life and money that used to be spent on gaming was oriented more to going out etc. A friend of mine recently started collecting 40k chaos marines and it sparked my interest up again, initially I was very hesitant as I knew if I started up the hobby again I would end up spending lots of money that I dont really have, saying that I did say to him at the time that if I was ever to pick up the hobby again i'd more than likely start an eldar army and take it from there. Moving on a few weeks i'm finding myself needing to go to ebay rehab after picking up one bargin after another at a more justifyable price for my wallet!! So much for being hesitant about getting back into the hobby.....

I'll add up what I have got and provide a list with pics in a future post but suffice to say I have a decent sized army that is in various stages of completion. Should have plenty to keep me occupied over the summer!!